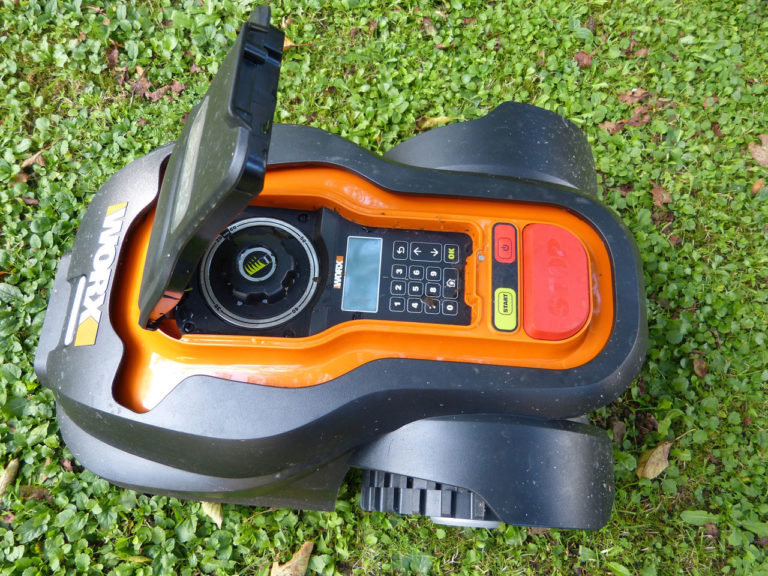
Many mowing robots use a boundary wire to mark the mowing area and a guide wire for better navigation. However, sometimes the cable can break, whether it has been damaged by your mowing robot, during gardening work with a shovel, or simply as a sign of age. In this article I would like to explain how to repair the cable.
How do you repair the boundary or locator cable on the mowing robot? In order to repair the robotic mower’s boundary wire, the damaged area must first be located. This can be done with an AM radio, or with special cable break detectors or other voltmeters. A cable clamp can then be used to reconnect the broken point correctly.
The repair of the boundary wire can be roughly divided into three steps, which I will explain in more detail in a moment:
- Problem analysis (is there even a cable break?)
- Finding the cable break
- Repairing the cable break
Throughout this manual I will be following these steps, so a step by step analysis can be done.
The guide wire can also be interrupted, I will also discuss this here.
You will need the following tools to repair your boundary wire:
Contents
How do you figure out if a cable has broken? – Problem analysis
What are the symptoms of a cable break?
In most cases, a broken cable means that the robotic mower does not want to start, even though it may be fully charged. It will neither drive off by itself nor can it be started manually. If your lawn robot is on the move when the cable is suddenly interrupted, e.g. when doing gardening work with a spade, it will stop abruptly and will not drive on.
In rare cases, it may also be that the cable is only occasionally interrupted, for example, during a certain weather condition. In this case, the problems mentioned above will only occur sporadically.
A cable break in the guide wire means that your robot cannot find its way back to the charging station, or that it cannot find its way to a certain remote start point (if your mowing robot works with these).
Is it the mowing robot or the charging station that indicates a broken cable?
On most robotic mowers, the LED lights on the charging station inform you if something is wrong with the boundary wire. Here is an overview of error messages from mowing robots from various manufacturers:
Note: A flashing green LED on some mowing robots means that ECO mode is active. Switch it off for the duration of troubleshooting.
HUSQVARNA
- LED flashes blue – boundary wire interrupted or not connected
- LED flashes yellow – Search cable interrupted or not connected
WORX
- LED flashes green – boundary wire interrupted or not connected
ROBOMOW
- LED flashes red quickly – boundary wire interrupted or not connected
- LED flashes red slowly – Bad connection with the perimeter wire or the wire is too long
It is rare that a cable break occurs and is not indicated by the charging station. Conversely, however, the charging station may indicate a problem with the cable when there is no broken cable.
Ruling out other possibilities for error before cable breakage detection
If your charging station indicates a cable break, it does not necessarily have to be a cable break. First of all, you should check to see if the cables are connected improperly or if there is something wrong with the connection between the cables and the charging station.
Check all contacts on the back of the charging station:
- Check if they are loose
- Watch out for corrosion on the connections
- Use contact spray
You should also rule out that the charging station is simply defective and therefore indicates the error. You can do this by building a “mini-loop” to test the charging station. Simply use a short piece of cable that you still have left over, enough for about 1 meter. You should do this for each loop, depending on how many loops can be connected to your Base Station.
If all test loops are connected and the LED light indicates that everything is OK, it is probably indeed a cable break.
What to do with a cable break on the boundary wire? – Troubleshooting
Which cable is affected?
Now that other sources of error have been eliminated and we can be relatively sure that it is a broken cable, the search continues. First of all, we have to find out which cable is affected.
There are 3 ways to identify which cable has the break.
1st possibility
In most cases, the LED lights on the charging station indicate whether the guide wire or boundary wire is affected. If this is the case for you, you are lucky and you can skip ahead in this manual to find the break. If the Base Station does not clearly indicate the cable, or if you have more than one guide wire, read on here.
2nd possibility
Another, relatively simple possibility is to plug the cables into the charging station in the order described in the instructions. Usually the boundary wire is plugged into the charging station first and then the guide wire(s). As soon as a faulty cable is connected, the LED will start flashing accordingly and the culprit is located.
3rd possibility
For advanced users: In the unlikely event that neither the 1st nor the 2nd option has given you an indication as to which cable is broken, but you have not yet given up on finding the fault yourself instead of calling a professional, there is still the option of finding the defective cable with a DVM multimeter in the 200 ohm range.
This is actually only recommended if you have such a device at home anyway, or if you can borrow one somewhere, because such a device costs a bit of money, and you can also just opt to get professional help.
A DVM multimeter is used to measure voltages and resistances. For this purpose, the cable to be tested is connected directly to the multimeter. To find the cable with the break, the resistance of the loops is measured. There are two variants here:
A: You leave the guide wire connected to the boundary wire via the Y-connector and measure the resistance between all combinations of end connections (less effort). For example, if the SK-BKR and SK-BKL sections have a high resistance, you know that the break is in the guide wire (see diagram).
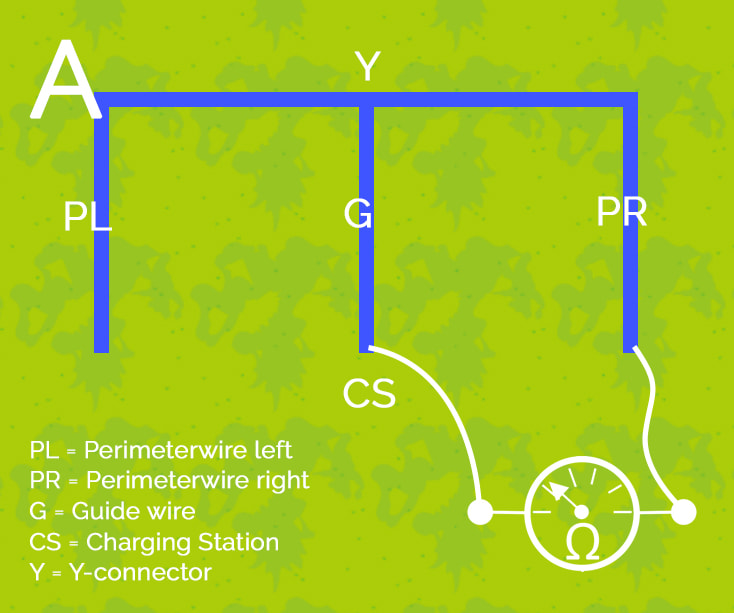
B: You unplug the Y-connector and measure the resistance between the beginning and end of the respective cable sections up to the Y-connector. The cables must then of course be unplugged from the Y-connector. To do this, you have to disconnect the resistance of the measuring cable extension that leads from the multimeter to the Y-connector.
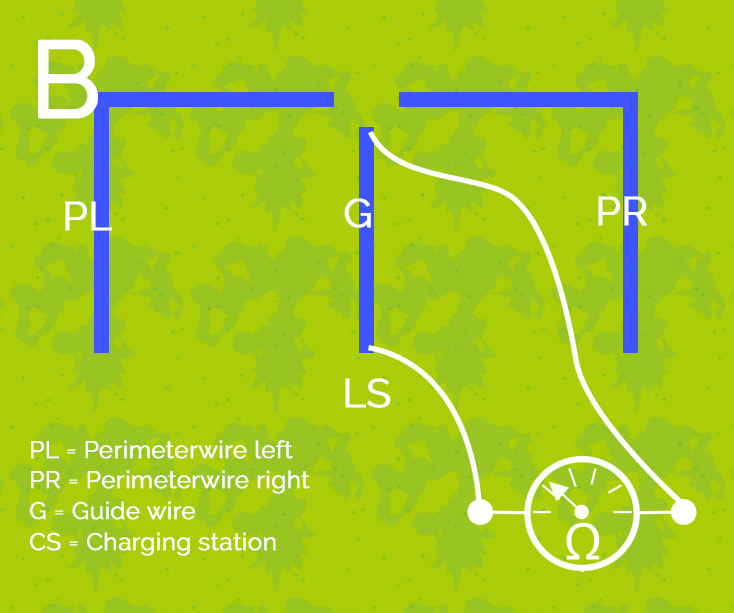
Now you must look at the measured values. Everything below 10 ohms is fine. Below 20 Ohm it may still work, but all cables above 20 Ohm are definitely defective and need to be repaired.
To find the break in the cable
Method A – Transistor radio
Now let’s get down to the actual finding of the break, now that you know which cable is affected. There are two different methods for this. For method A you need one of the following devices:
- AM radio/transistor radio
- Cable break detector
Finding a defect in the boundary wire
- Make sure that the Eco mode is switched off (if applicable)
- Disconnect all cables at the charging station
- Plug the defective cable into the connector of the guide wire (clearer signal)
- Close to the charging station, move the radio closely over the cable. Keep the ferrite antenna parallel to the cable
- A rhythmic tone will sound. If not, turn the frequency knob until the tone is heard
- Follow the cable with the radio
- If the sound becomes significantly quieter or becomes interrupted, that is where the cable is interrupted
- Carefully dig out the cable
- Connect the cable to a cable connector at the defective point
- Before you bury the cable, plug all cables back into the charging station and check if the problem still exists
- When the problem is solved, dig the cable back in
- If it is not remedied, check with the transistor radio whether there is another break or the new cable connection is not connected properly
Finding a defect in the guide wire
- Make sure that the Eco mode is switched off (if available)
- Disconnect all cables except the affected guide wire at the charging station
- Close to the charging station, move the radio closely over the cable. Keep the ferrite antenna parallel to the cable
- A rhythmic tone will sound. If not, turn the frequency knob until the tone is heard
- Follow the cable with the radio
- If the sound becomes significantly quieter or interrupted, this is where the cable is interrupted
- Carefully dig out the cable
- Connect the cable to a cable connector at the defective point
- Before you bury the cable, plug all cables back into the charging station and check to see if the problem still exists
- When the problem is solved, rebury the cable
- If it is not remedied, check with the transistor radio whether there is another break or the new cable connection is not connected properly
- You can use the cable break detector in the same way.
Method B – Electric fence
A completely different approach can be taken using an electric fence. This device chases a strong current through the cable, which creates a clearly audible gap at the point of breakage.
The electric fence has three connections or poles. However, you only need the grounding pole and one of the other poles.
After you have disconnected all cables from the charging station, proceed as follows:
- Again, make sure that there is really no more boundary wire or guide wire connected to the charging station, to prevent damage!!
- Ground the earth terminal of the electric fence (e.g. with a screwdriver stuck in the ground)
- Connect one end of one of the cables to one of the other poles (third pole remains unused as mentioned above)
- Switch on the electric fence
- The device sends a current through the cable
- Where the cable breaks, you’ll hear a hissing sound
- Leave a marker on the ground where you hear the break
- Turn off the electric fence and disconnect the boundary wire or guide wire from the fence
- Carefully dig out the cable
- Connect the cable to a cable connector at the defective point
- Before you bury the cable, plug all cables back into the charging station and check to see if the problem still exists
- When the problem is solved, rebury the cable
- If it is not fixed, check the connection again
If the connection is okay, there may be another break
Extra tip: In damp weather, when the ground is wet, this method works even better because the hissing becomes louder.
How do you repair the fracture? – Troubleshooting
This can be done quite easily with a cable connector. Both cable ends must be plugged into the cable connector. Make sure you put them as far as possible into the cable connector. The cables must not be stripped beforehand. If the two cables are inserted correctly, you have to press the cable connector together with a pair of pliers.
Here are two videos which illustrate the whole process well.
Robomow has a slightly different system:
I’ve tried everything and can’t find the broken cable
There are several reasons why you may not be able to find the broken cable. For one thing, it is possible that a cable has only “broken.” In the various test procedures, the location may then not be found, although the problem prevents the mowing robot from driving.
In rare cases, the boundary and guide wires are also used with cables that have a very high resistance. In this case, it is difficult to find the location with the above methods. To find the break here, you need a laboratory power supply. It is best to order a specialist.
There are also cable breaks that are only noticeable in certain weather conditions. Maybe you are testing at the wrong time when the cable is working and then when you want to start your mowing robot, there is “the wrong weather” again. Pay attention to whether the problem occurs depending on the weather.
If you just can’t find the broken cable, you should probably get a professional to come.
How to avoid cable breaks
Here are a few tips to avoid annoying cable breaks:
- When laying the cable, take photos of where the cable is being laid so that you always know exactly where you can dig and where you cannot
- The best thing is to go one step further and make an exact plan of where the cable is laid
- Do not stretch the cable too tightly, especially if the property is not at ground level. Otherwise the cable can be stretched in awkward places and will be cut by your mowing robot
Related questions
Which boundary wire should you choose? Mowing robots can usually use the boundary wire from any mowing robot manufacturer. However, you should make sure that it is a boundary wire for a mowing robot with approximately the same area output. The longer the boundary wire, the greater the electrical resistance in the cable. For this reason, boundary wires for large areas is of a slightly different nature than wires for small areas.
Also interesting: Which boundary wire should you choose?
Are there cheaper alternatives to the robotic mower boundary wire? In principle, any other weatherproof cable can be used as an alternative to the original boundary wire. H07V-U single core cables have proven to be an especially good alternative.