Your robotic mower requires regular care and maintenance. The maintenance of your equipment is important so that the robotic mower will last long as possible while still providing quality service. After all, the startup costs are quite expensive, so you should avoid neglecting your robot and ending up wasting your money. Robotic mowers require comparatively little maintenance, so it is even more worthwhile to put in the little work that is necessary.
What type of maintenance does a robotic mower require? Robotic mowers should be cleaned regularly. This applies above all to the shell and the wheels. Depending on the model, the blades need to be replaced with varying frequency, either every few months or every year. Sensors and the battery should also be checked once per year.
In this article, I’ll show you how to maintain and care for your robotic mower with plenty of useful tips. At the end I will answer some frequently asked questions.
Contents
Why is it important to properly maintain the robotic mower?
Robotic mowers are designed to require relatively little maintenance. However,the little maintenance they do require is very important. After all, it is a very expensive piece of equipment that you certainly want to use for as long as possible. At the same time, you want the machine to do its job optimally. But don’t worry, the regular maintenance and care are super easy.
Poorly maintained robotic mowers work inefficiently
If you do not maintain your robotic mower properly, it will not do its job properly. Then you will find yourself pouring money into a device that ultimately has no use. Therefore, you must always ensure that the robotic mower can function without hindrances.
Things that can hinder the proper function of a robotic mower are:
- Dull knives: With these, it does not cut the lawn, but plucks it and causes considerable damage. Instead of improving the lawn quality, it deteriorates it. In addition, the device becomes louder, consumes more energy, and thus also uses up the battery more quickly.
- Dirty wheels: dirt, grass clippings, and leaves can accumulate on the wheels over time. This reduces the grip of the machine on the ground and increases the risk of the machine getting stuck or slipping on slopes.
- Dirty chassis: If the dirt gets between the wheels and the body, or on the axle, it can slow down the robotic mower. This reduces its area output, and it will consume more energy.
- Dirty mowing unit: A dirty mowing unit also leads to increased energy consumption and produces a louder volume.
- Dirty sensors: If a robotic mower is very dirty, dirt can get between the body and the shock sensor, for example. Then it can either happen that the impact sensor triggers although the robotic mower has not hit anything, or it does not trigger at all. Even a dirty rain sensor cannot function properly.
- Dirty charging contacts: Dirty charging contacts are a problem because the robotic mower charges more slowly. This means that it spends more time recharging its battery between mowing cycles, which also reduces its area output. It may then no longer be able to mow the entire lawn properly.
Poor maintenance will result in long-term damage
If you don’t maintain and care for your robotic mower properly, this not only makes it inefficient, but can also cause damage in the long run, which then results in more expensive repair costs. Proper maintenance is therefore very important.
Corroded charging contacts, for example, can also suffer damage in the long term. In the event of very severe corrosion, the charging contacts become brittle. If you don’t clean the lawn robot for a long time, the chassis or mower can also suffer damage in the long term.
In addition, you should always keep an eye on what is going on with your robotic mowers. If you maintain your robotic mower regularly, you will also have a better view of whether your robotic mower has had anything find its way into the mowing unit that it shouldn’t be mowing, for example.
If you regularly service your robotic mower, you will quickly notice whether the blades dull unusually quickly or have taken any damage. Perhaps a large branch got into the mower? Does your robotic mower have to deal with a lot of fallen fruit? Can you find remains of pebbles? Or even pinecones? The latter also like to get wedged in the mower deck.
These are problems in the lawn that should be solved in the long term, as they can have a negative effect on the durability of the mower. The battery also wears out faster if the robotic mower has to deal with different things than what it is used to when mowing. This is especially true for robotic mowers with blade discs.
If you were not yet convinced why regular maintenance of your robotic mower is important, hopefully now you are. Regular maintenance really doesn’t require much effort and is very simple, unlike other devices such as gasoline mowers. So it is definitely worth the time!
So, now that you’re convinced, here is a complete guide on how to properly maintain and care for your robotic mower.
Overview: What maintenance is there when it comes to the robotic mower?
Before we dive into the subject completely, I’d better give you an overview of what is important when it comes to maintaining a robotic mower. Some parts need to be serviced and maintained very regularly, while other parts only need maintenance once a year.
The annual maintenance is then usually accompanied by wintering, or mothballing the robotic mower in Spring. At these times of year, it is also advisable to do a thorough cleaning and various other maintenance work that is not needed as regularly.
In the first part I will go into the regular maintenance. This is followed by explanations of the annual maintenance.
Regular maintenance and care: step by step instructions
The blades, the housing, the wheels and the charging station should be maintained and cared for regularly. Here I will show you how you can proceed with the regular maintenance.
The following items should be serviced regularly:
- The blades
- The shell
- The wheels
- The charging station
1. The blades should be replaced regularly
There are different blade systems for robotic mowers, about which we have already reported in detail on our blog. The most common are called blade discs (HUSQVARNA, WORX, REDBACK, YARD FORCE, MCCULLOCH, HONDA, GARDENA, BOSCH) and star crosses (ROBOMOW, STIGA, AMBROGIO, WIPER, JOHN DEERE, WOLF-GARTEN).
No matter which blade system your robotic mower uses, the blades must be replaced regularly. Dull blades give an unclean cut, do not cut the lawn but pluck it, worsen the lawn health and drain the battery much faster.
One of the main differences between the two types of blades, blade discs and star crosses, is their robustness. Although star crosses have some disadvantages in terms of safety and noise production compared to blade discs, they are much more robust and do not wear out as quickly. The systems are also built differently, so below I’ve listed the procedure for each individual system.
Mowers with blade discs
If you have a robotic mower with a rotating disc on its underside, similar to a plate, to which in three or four blades are attached, your robotic mower has a blade disc.
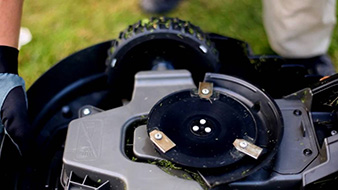
The blades on a blade disc should be replaced after one to three months at the most. How quickly the blades wear out depends on many factors, so it is difficult to give an exact figure. You simply need to find out how long it takes for the blades to become dull on your robotic mower and your lawn. You can tell this from looking at your lawn: If the blade tips look tousled, with a slightly grayish brownish tint, the blades are dull.
A new set of blades (pack of 30) costs between $15 and $25, depending on the manufacturer. If your robotic mower uses 3 blades, you can change the whole set three times with such a pack. There are also blades with special titanium coating from third party suppliers that last even longer. Some brand manufacturers have also responded to consumer demands and are now producing blades with longer durability, such as the “Long Life Safety Blade” from HUSQVARNA. I have seen the latter only being sold in Europe and Australia though. It might be a while until they are also being sold in North America.
How are the blades replaced? Changing the blades is very easy. You need a screwdriver, the interchangeable blades, and the screws. It is best to wear protective gloves, because the blades are sharp!
- Important: Switch off the device with the main switch
- Unscrew the old blades
- Clean the area underneath, for example with a hard brush
- Attach the new blades
- Check if the blades can be turned easily after assembly
- If the blades cannot be turned, you have mounted them incorrectly
Important safety instructions:
- Do not use a cordless (eletrical) screwdriver: there is a risk of the blades flying off. Blades whirling through the air are dangerous!
- Use protective gloves if possible, because the blades are sharp!
- Use only new screws: The old screws may have become rusty and brittle. When mowing, there is a risk that an old screw will break and the blade will come loose.
And done! It wasn’t that complicated, was it? With a little practice it really goes super fast! If you want to know more about replacing the blades and different ways to improve the durability of the blades, read this article.
In the following video you can see quite clearly how the blade change works with the HUSQVARNA Mowing Robot.
Mowing unit with star cross
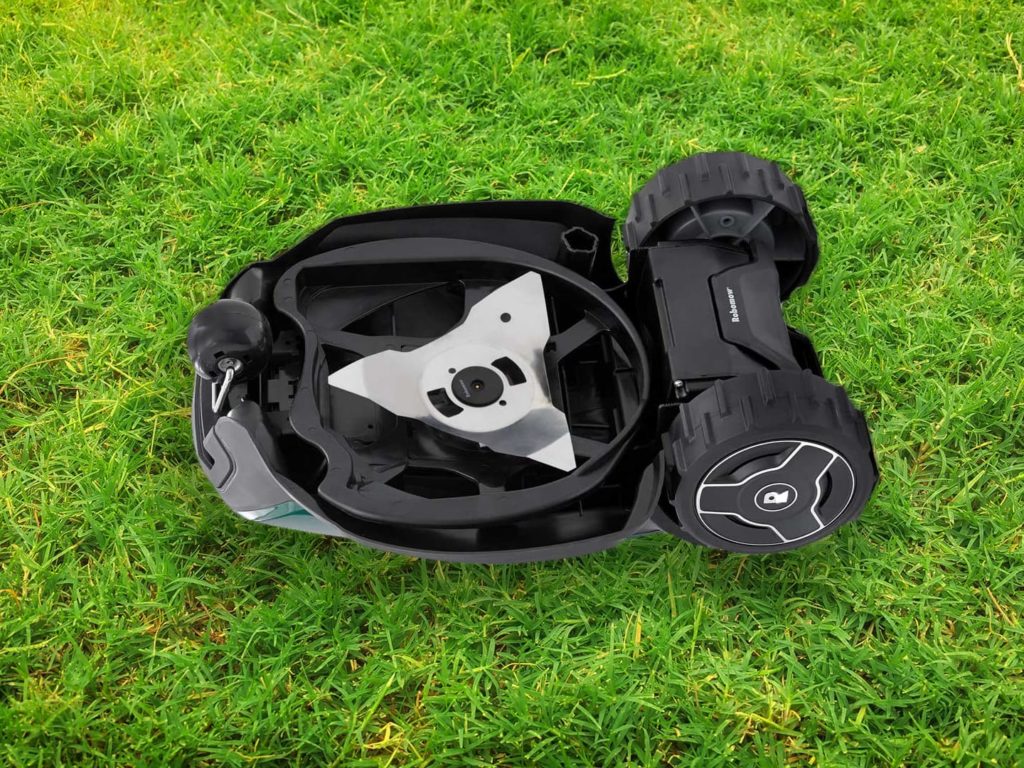
For robotic mowers with star crosses there are two different types. The first type I call simply “Type ROBOMOW”. Here it concerns a triangular blade, which is used by ROBOMOW robotic mowers. Star blades from ROBOMOW can be exchanged very easily with a kind of click system.
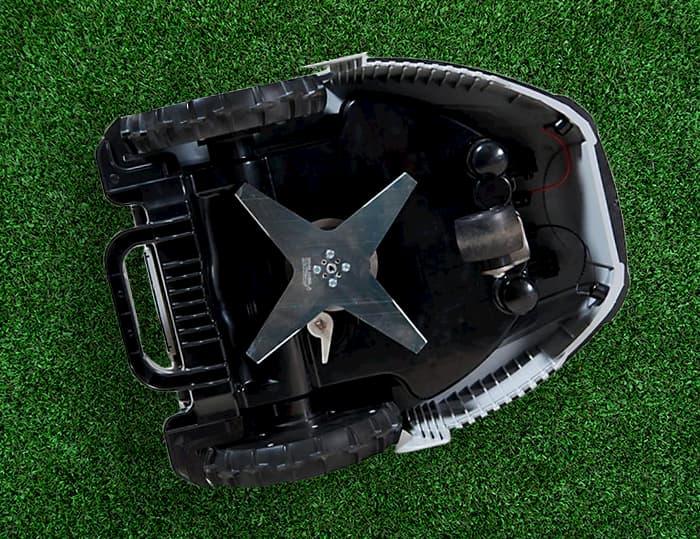
The other type of star cross is a four-pointed or six-pointed star. It is used for example by AMBROGIO, WIPER, JOHN DEERE and STIGA. These blades are fixed in the middle by several screws.
Since these blades are much more robust, they usually only need to be replaced once per season. A new blade costs between $30 and $50. Some robotic mowers with very large cutting widths use several blades at the same time, so replacing blades costs more.
Blades from ROBOMOW
How are the blades replaced? Replacing the blades is even easier with these devices than with any other device. You do not even need a screwdriver. Instead, you need the included blade clamp. And of course the new blade. I would also recommend that you use protective gloves.
- Important: Switch off the device with the main switch
- Place the blade clamp on the two holes provided for this purpose on the blade. There are two hooks inside the holes. First move the blade clamp into the holes slightly offset to the hooks, then turn the blade clamp so that the hooks can be pressed together with it.
- Press the blade clamp together and pull out the blade
- If necessary, clean the area below with a stiff-bristled brush
- The new blade can now simply be pressed on and locked in place
The whole thing requires a few clever moves, but with a little practice you’ll get the hang of it soon. Surely this video will help you to understand the process of blade changing.
Blades with star-shaped serrations (AMBROGIO, WIPER, etc.)
How are the blades replaced? With these blades you need a screwdriver, the right screws, and of course a new blade.
- Important: Switch off the device with the main switch
- The screws are usually located in the middle of the blade. Loosen these screws with the screwdriver.
- If necessary, clean the area below with a stiff-bristled brush
- Place the new blade on top and fasten it with the screws. Tighten the screws well.
The following video shows the replacement of the blade on a WIPER robotic mower.
2. Maintenance and cleaning of the shell
You should also clean the shell regularly, both on the outside and the inside. However, only a simple rough cleaning is really necessary here. The following utensils are sufficient for cleaning:
By the way, there are special robotic mower brushes that make it easier to get into the corners and crevices of the shell. Just have a look at my recommended care products for cleaning the robotic mower. Alternatively, you can use a toothbrush for small areas.
You can now clean the shell carefully with a damp cloth and brush. You can also opt to remove the grass residue with a vacuum cleaner if you’d like. Compressed air provides the final touch, so you can get grass clippings out of narrow spaces very well.
Be especially careful that you do not cut yourself on the blades. If you want to replace the blades anyway, first disassemble them, then clean the machine, and do not put the new blades back on until the end.
Check the charging contacts of the robotic mower. If you find corrosion there, you should remove it with sandpaper and then grease it a little. Corrosion can hinder the charging of the robotic mower, and in the long run even make the charging area brittle.
Some of the newer HUSQVARNA units are splashproof and can actually be cleaned with a lawn hose (e.g. HUSQVARNA Automower 305). However, check the description of your device again carefully to see whether this also applies to your robotic mower. Robotic mowers that you can hose down with a lawn hose need the water protection class IPX5.
The outer body of the robotic mower is exposed to many weather conditions. In particular, they are also exposed to continuous UV radiation. There are special sealing sprays from the automotive sector that provide perfect protection for robotic mowers as well.
At the end of the whole thing take a clean cloth and give the whole thing a dry rub to remove any remaining debris. Polishing cloths work not only on cars but also on robotic mowers.
In my recommended care products for robotic mowers you will find a super good sealing spray suitable for robotic mowers, as well as suitable polishing cloths.
3. Maintenance and cleaning of the wheels and other moving parts
What you need for this:
Here you can find some suitable care utensils.
After a short time, the wheels often accumulate a lot of dirt, grass clippings and leaves. They worsen the grip of the robotic mower and can also hinder it while driving if they get into the gaps between the wheels and the housing. Therefore you should clean them as often as possible. In dry periods it is enough to clean them every two weeks; in wet conditions it would be better to clean every week.
You can also work with the brush, and additionally with a vacuum cleaner or compressed air. With a toothbrush, a special robotic mower brush, or even compressed air you can clean very narrow spaces.
At the end of the process, rub everything dry with a clean cloth.
Moving parts should now be treated with a little precision mechanics oil, machine oil or WD-40. Then the parts will run smoothly again!
4. Maintenance and cleaning of the charging station
With the charging station you don’t have to do too much. It is enough to check every few weeks if cleaning is necessary. First of all, you should remove any leaves and make sure that everything is in order with the charging contacts. Can the robotic mower drive into the charging station unhindered and can the battery be charged without any problems? Then everything is in order!
Do the charging contacts have corrosion? Remove them with sandpaper and grease them a little bit afterwards. Corrosion hinders the charging of the robotic mower and can even make the loading plates brittle in the long run.
Here are a few hints and tips for regular maintenance of the charging station:
- Clean the charging station every few weeks. Clear it of soil, grass clippings, leaves and other things. Use a brush for this. Wipe with a damp cloth.
- Make sure that the charging contacts of the charging station are free of any dirt. Wipe these briefly with a wet cloth and then wipe dry.
- For special protection of the charging station, you can also get a robotic mower garage. These are our currently recommended robotic mower garages.
Annual maintenance: What to do
Some things on your robotic mower do not need to be maintained quite as often. With these, it is sufficient to perform maintenance once a year. There are generally two times a year that you can do this: when putting the robotic mower away for the Winter, or taking it back out in the Spring.
During the annual maintenance we take care of the following things:
- Battery
- Charging station
- Sensors
- Updates
Battery care: Test the remaining capacity of the battery
The battery supplies the robotic mower with energy. As you certainly know, batteries also have a limited lifetime. Over time, their capacity decreases. Depending on the type of battery, there are big differences in terms of lifetime, correct handling, sensitivity to incorrect handling, etc.
In this article I have introduced the different types of batteries used in robotic mowers, and I also talked a bit about their lifetime. Fortunately, almost only lithium-ion batteries are used nowadays, because they are quite easy to handle.
With other types of batteries, such as nickel-metal hydride (NiMH) batteries, there were still things like the so-called memory effect. However, you don’t need to worry about this with a lithium-ion battery (Li-Ion) or a lithium-iron-phosphate battery (Li-Fe, a special lithium-ion battery), which are now used almost exclusively in robotic mowers. Therefore, I will now only deal with the topic of lithium-ion batteries for robotic mowers. For other battery types a slightly different care is necessary.
Battery Test
If the maximum charge capacity drops below 75%, you should replace the battery. This can happen after a few years. Since the life of the battery is influenced by many factors, it is difficult to give an exact number. However, you can expect a life span of about 2 to 6 years.
With many robotic mowers you can read the charge level of the battery on the display or with smart robotic mower models, also via the smartphone app. There you will find a percentage value. However, this is of no use to you, because if the battery no longer reaches its maximum charging capacity, this value is incorrect.
What you are looking for is an absolute value in milliampere-hours (mAh). For example, the battery could hold a maximum of 1700 mAh. If your robotic mower only reaches 1200 mAh when fully charged, you divide 1200 by 1700 and get 70%.
Unfortunately, the robotic mower/battery never knows exactly what its exact charge is (even if the percentage figure sometimes suggests it does). If you have an old smartphone, you may have noticed that your smartphone still shows 20% battery, and the next moment it turns off because the battery is empty. The smartphone may still reach “100% charge”, but in reality the battery does not reach that capacity at all. It is the same with robotic mower batteries.
In order for the robotic mower to know its exact load, you have to let it completely drain. Then it can count up from zero and knows its exact charge. To do this you have to perform the following test:
- Let your robotic mower mow an area from which it cannot return to the charging station
- This can be a separate lawn
- Alternatively you can block access to the charging station
- As a further option you can mask the charging contacts of the charging station
- Let the robotic mower mow until the battery is empty
- Now fully charge the robotic mower
- Check the battery status of the robotic mower (in mAh)
Since there are dozens of robotic mower manufacturers and an estimated hundreds of models, I cannot explain here exactly where you find this mAh value for each device. With many HUSQVARNA Automower models, it works like this: Press and hold “0” until a menu pops up. Choose “Information” and then “Battery” There you will find all the information.
This value is now equal to the maximum possible capacity of the battery you are using. Now you know how much your battery is worn out, or what percentage it will only reach.
Battery test using the example of HUSQVARNA Automower
With every robotic mower, testing the battery can be a little different. Here I show you the procedure for HUSQVARNA G3 generation mowers:
- Place the robotic mower in the charging station and open the display.
- Set the robotic mower to “secondary area mode” and close the display.
- The battery is now fully charged. When fully charged, the robotic mower moves out of the charging station and stops in front of it.
- Open the display again and turn the robotic mower towards the lawn, setting the cutting height slightly higher. This gives the robotic mower a slight mowing resistance during the battery test.
- Leave the robotic mower in secondary area mode, press START and close the display.
- Now the robotic mower starts mowing until the battery is completely discharged and then stops on the lawn. The charging capacity of the battery is now stored in the robotic mower.
- Put the robotic mower back on the charging station, open the display, set the mode back to main
- Press keys 7 and 9 simultaneously in the menu
- The menu item Tools opens: Menu > Tools (Expert) > Info > Battery
Storage of the battery in winter
When wintering the robotic mower, special attention should be paid to the battery, because you need to store it properly to ensure that the battery lasts as long as possible.
Before you put the robotic mower into Winter mode and remove the charging station, you should recharge the battery again.
However, many make the mistake of charging the battery to 100%. Instead, charge the battery to just over 70%. Then store it in a dry and frost-free place!
Why should the battery not be charged to 100% before storage? Lithium-ion batteries age not only through repeated charging cycles, but also while they are not in use. They age at different rates depending on their charge status. The aging process is significantly faster if the charge level is below 30 % but also above 70 %. Permanently high charge levels are generally harmful to lithium-ion batteries. Therefore, it is advisable to keep the charge level between 30 % and 70 % when storing lithium-ion batteries.
In addition, batteries drain over time, even when not in use. The higher the charge level, the faster they discharge. So it is not of so much use if you charge the battery to 100%, because it loses its maximum charge level quite fast.
Charging station: Care and maintenance
Once a year you should also do a thorough maintenance of the charging station. In addition, simply clean it as described in the regular maintenance section, using a brush and a damp cloth. You can be a little more thorough. If you cover your charging station in the winter or even bring it in, it is a good time to do this during the Winter.
Additionally you should take care of the charging contacts:
- Remove any dirt from the charging contacts with a damp cloth
- Wipe them dry afterwards
- Check the charging contacts for corrosion. Corroded charging contacts have a greenish shimmer.
- You can sand the corrosion with sandpaper
The charging station in Winter
You can remove the charging station for Wintering, but it is not absolutely necessary if you have mild-moderate Winters.
However, you should make sure that it does not snow excessively on your charging station. If you have a lot of snow falling, it could be problematic with very heavy snow loads.
If you do remove the charging station, you should insulate the ends of the boundary wire and, if present, the guide wire with insulating tape. You will find a suitable insulating tape in our recommended Winter equipment.
Tip: You can also cover your charging station with a protective tarpaulin in winter. You can also find this in our recommended Winter equipment.
Does the charging station have to remain connected to the power supply? There is no clear statement on this. Some manufacturers explicitly write in the operating instructions of their robotic mower that the charging station should remain connected to the power supply, while others write the exact opposite, that the charging station should be disconnected from the power supply in any case. Look in the manual of your specific machine.
My recommendation: buy a robust closed robotic mower garage that can remain outside in winter (some plastics cannot tolerate low temperatures). This protects the charging station sufficiently even in winter and you don’t have to remove it. The disassembly and assembly of the charging station is comparatively complex. In addition, the boundary and locator cables must be stripped, checked for corrosion when the robotic mower is reactivated and removed if necessary.
Here you will find our recommended robust robotic mower garages made of wood or metal.
Checking the sensors
The sensors are among the most important components of the robotic mower. They not only ensure that it can navigate in your lawn, but also enable safe operation. You can and should check some robotic mower sensors yourself. The best time for this is when you take the robotic mower out again in Spring.
The following sensors should be checked during commissioning in spring:
- Shock sensors
- Lift sensor
- Tilt / Inclination Sensor
- Rain sensor
- Alarm
- Ultrasonic sensors
- Resistance sensor
Shock sensors
The robotic mower has shock sensors on different sides. You can easily check these. Let the robotic mower drive against an obstacle. It should then reverse and continue in a different direction.
Many robotic mowers also have shock sensors at the rear. Let the robot drive against an obstacle when reversing to test it.
Does the sensor fail to trigger? In this case, there could be dirt or grass residue between the outer bodywork and the inner workings of the robotic mower. If you can remove the outer hood of the robotic mower, remove it and check again that everything has been thoroughly cleaned.
Lift sensor
Lift the robotic mower from the ground during operation. The robotic mower should then switch off, in particular the mowing unit must stop! This is an important safety function. With many robotic mowers, the lift sensor also serves to trigger the alarm. If the sensor does not trip, you should send the robotic mower for repair.
Tilt / Inclination Sensor
While mowing, lift the unit from one side so that the unit is at an angle. At a certain inclination the robotic mower including the mowing unit should switch off. If this does not happen, something is wrong with the sensor. Even then, your device must be repaired.
Rain sensor
Some robotic mowers have a rain sensor. You can easily test this: Simply water the robotic mower with a watering can or similar. Then it should return to the charging station.
Note: If you have a HUSQVARNA robotic mower you will look for a rain sensor in vain. They do not have one and do not need one.
Alarm
Almost every robotic mower has an alarm. This can be triggered in different ways. One possibility is to lift the robotic mower during operation. The alarm can be switched off again with a PIN code. When testing the lifting sensor or the tilt sensor, it should have already been triggered.
If it has not triggered, test it again now. If it does not trigger again, but the other expected reactions of the robotic mower occur (it switches off, the mower is deactivated), there is something wrong with the alarm
Ultrasonic sensors
Some robotic mowers are equipped with ultrasonic sensors. These are sensors with which robotic mowers can recognize objects as obstacles even from a distance and move to avoid them (e.g. WORX), or brake to avoid hitting them (e.g. HUSQVARNA). You can easily test this by placing an obstacle in the direction of travel of the robotic mower.
Resistance sensor
Some robotic mowers have a special resistance sensor that is attached to the shaft of the mowing unit. This sensor determines how “difficult” it is to mow the lawn, which is roughly equivalent to how long the lawn is at that point. Robotic mowers with this sensor have a function called “spiral mowing”.
To test the functionality of the sensor, first make sure that the option “Spiral Mowing” is active. Set the cutting height of the robotic mower as low as possible, then place the robotic mower on a high piece of lawn when it is charged and start it manually with the START button. Now the robotic mower should start to mow the area in a circle because the resistance sensor has triggered. If not, something is wrong with the sensor.
Installing updates
Your robotic mower is equipped with a software, the so called firmware (you could also call it the operating system in the case of a robotic lawn mower). This is virtually the brain of your robotic mower, without this it could not work. The manufacturers of the different brands are continuously developing it further and thus creating new versions of this firmware.
Often the first version is not really mature yet. There are still many possibilities for improvement, here and there the odd bug or new ideas about how to improve or extend the functions of the robotic mower. Also very often things at the navigation of the robotic mower are improved.
Here is an example of what can be added with a software update. This particular model is very popular in Germany but is not being sold in North America (yet):
The GARDENA Sileno city has been given the following functions with a mere software update:
- Spot Cutting (spiral mowing in places that are rarely mowed)
- SensorControl (adjustment of mower frequency to lawn growth)
- CorridorCut (mow narrow corridors as small as 24 in wide)
- Frost sensor (below a certain ground temperature the robotic mower stops mowing)
- Gradient upgrade: Instead of 25 %, robotic mowers now know 35 % mowing
Pretty impressive that a mere software update can add all these new features, right? But don’t be disappointed if not every software update brings along such a feature explosion. This was just to show you an extreme example. Most of the updates simply fix minor bugs in the operating system or navigation.
Therefore it is often worthwhile to install firmware updates on your robotic mower. These are of course free of charge. With some robotic mowers this even works automatically. If you have a smart device that is connected to the Internet via WiFi, it will usually download the firmware updates automatically.
But there are also many devices where you have to update the firmware manually. This usually works via a USB interface. The robotic mower has a USB port to which you can connect a USB stick with the firmware update. With some robotic mowers you have to connect your PC directly to the robotic mower via USB cable. You can get the firmware from the manufacturer of your robotic mower. There you should also find a description of how to update the firmware.
With some robotic mowers you cannot install the firmware update yourself, instead it must be done by the dealer or an authorized workshop. This is the case with HUSQVARNA for example.
Maintenance Services
Would you rather have the work done by a professional? For the annual maintenance there are also services you can take advantage of if you don’t want to do the maintenance yourself. Many service providers also offer a special Wintering service, optionally including Winter storage. This way you do not have to store your robotic mower yourself. Here is a list of different service providers. Ask your local robotic lawn mower dealer if they also offer maintenance services. It’s worth the money, trust me!
Frequently asked questions
Can the robotic mower be cleaned with a lawn hose?
Most robotic mowers should not be cleaned with a garden hose. The water can penetrate into narrow cracks and thus get to the electronics, which can lead to a defect of the device. There are some exceptions. For example, the HONDA Miimo HRM 3000 model may be cleaned with a hose. If it is possible to clean your device with a garden hose, this is explicitly stated in the operating instructions. The device must meet the requirements of water protection class IPX5.
Can the robotic mower be cleaned with a high-pressure cleaner?
Under no circumstances should robotic mowers be cleaned with a high-pressure cleaner! As the name suggests, high-pressure cleaners spray water at very high pressure. The water gets into the narrow cracks of the robotic mower and leads to defects in the electronics. The high pressure could also cause external damage. So far, there are no robotic mowers with a sufficient water protection class against high-pressure cleaning.
Can the robotic mower be cleaned with compressed air?
Robotic mowers can also be cleaned with compressed air. A standard air compressor can be used for this purpose. Also typical compressed air cleaners from a can may be used. With their help, impurities can be removed from narrow cracks of the robotic mower.