How does a robotic mower work across different surfaces? How does it know when and how to drive onto each area, and how does it function in these different areas? I have dealt with these questions in detail and would like to share my findings with you here.
How can mowing robots mow on several differing areas? Robotic mowers have various options that allow them to mow on several surfaces. Functions such as remote start points or the passage function help them do this. But even completely separated areas can be mowed by the same robotic mower under certain conditions.
In this article I would like to explain everything about mowing several different areas with a mowing robot. Of course, there is an almost infinite number of possibilities for scenarios with different areas: more than two areas, completely separated areas, areas that are partially connected, areas with large size differences and so on.
So that you do not get lost in all the information, we will take things step by step.
Contents
Main, adjoining, and separate areas
Before we get down to business, it makes sense to first make a basic distinction between the types of areas before going into the different ways in which they can be mowed by the mowing robot. It makes an essential difference whether the areas are connected to each other or completely separated from each other. Different areas in the yard can basically be assigned to one of the following terms:
- Main area
- Adjoining area
- Separate area
The terms “main zone,” “adjoining zone,” and “separate zone” are akin to the terms “main area,” “adjoining area,” and “separate area.” The terms “main zone,” “subzone” and “separate zone” are also used.
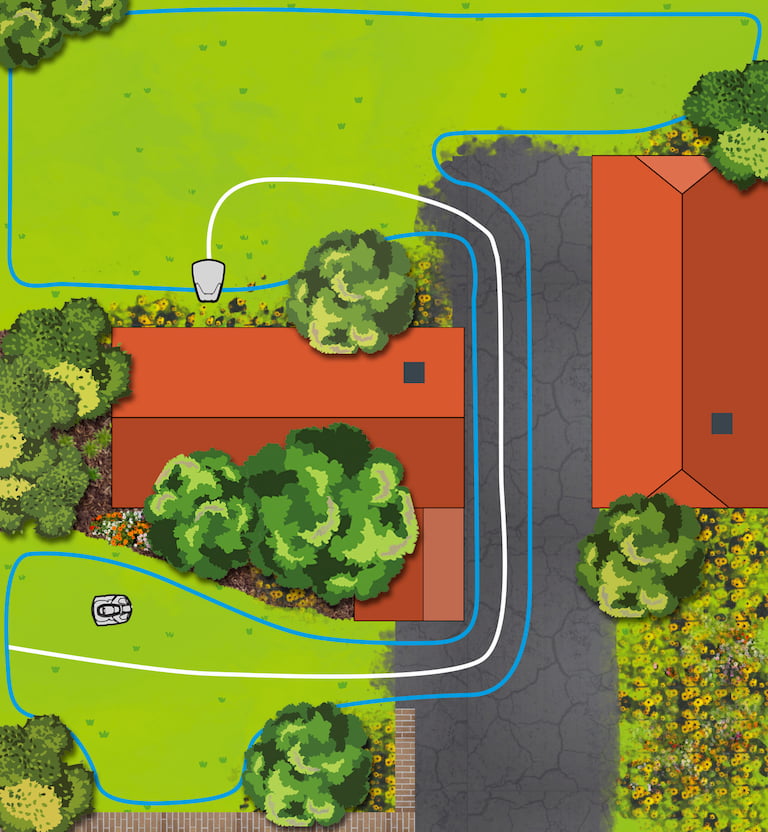
The following figure shows you how the boundary wire is laid in the case of several surfaces.
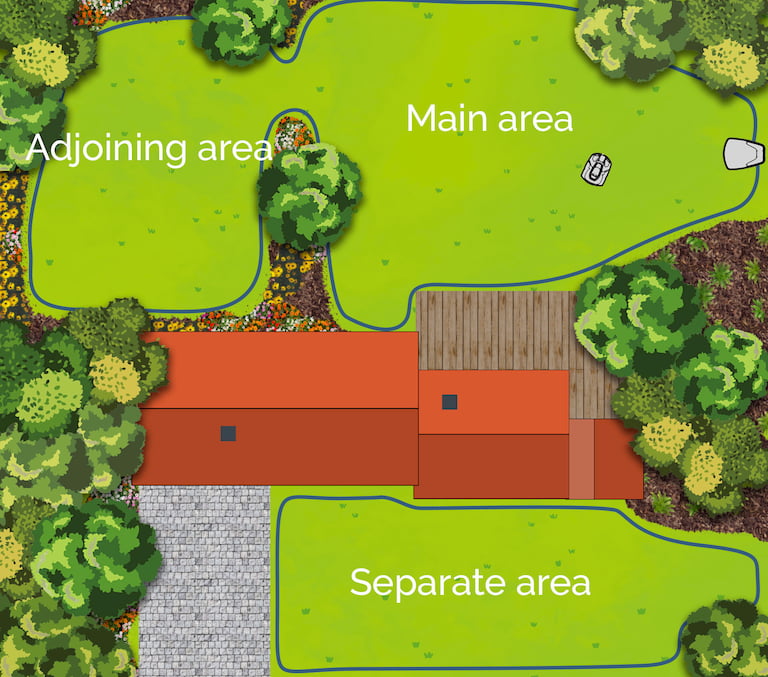
- Main area: This is the area on which the mowing robot will mainly mow. Usually this is the largest area of the lawn. In any case, the main area is where the charging station is installed; it might also be installed in the immediate vicinity, e.g. on a terrace.
- Adjoining area: This is an area of the yard that is connected to the main area, so that the mowing robot is able to reach it from the main area. The connecting passageway between the two might not even be grass: for example, the areas can be connected by a paved path on which the robotic mower can drive. The adjoining zone uses the same cabling as the main zone.
- Separate area: This area is not accessible from the main area and therefore not from the loading station of the mowing robot. There is no possibility to connect this area with the main area- it might be separated by a wall or a fence, or even on the other side of your house. If you were to create a small hole in the fence through which the robotic mower could drive, it would then become an adjoining area. The separate zone can use the boundary wire of the main zone depending on the situation. However, sometimes a separate cable must be installed.
It is of course possible that your total yard area consists of a combination of these types of areas. In addition, there may be chains of connected areas, or areas the branch off of each other. Imagine that there is a main area from which a path leads North to an adjoining area, behind which there is another adjoining area. Then you turn West, and there is another adjoining area, plus another area that branches off of that one. Can a mowing robot do that? Of course it can! You only need the right model.
Which methods and techniques are available for robotic mowers that can mow multiple areas?
Connected areas
For connected surfaces there are a number of functions you should know if you want to choose the right model for your yard. I will first present them to you individually here; later I will delve into various examples and explain which techniques are suitable and why.
Multi-Zone function
The multi-zone function is a feature that you will mainly find on Worx robotic mowers. It is used to mow several connected areas with one mowing robot, taking the different area sizes into account. This works as follows.
As you know, robotic mowers that utilize boundary wires will enclose the entire mowing area with a boundary wire. This also applies to adjoining areas. The cable is therefore drawn around all areas and a narrow corridor is left with the cable as a connection between the areas, through which the robotic mower can fit.
You can set up so-called remote start points on this cable. Most Worx models have an app in which you can activate the multi-zone function. In this app you define how many zones you want to have. In most cases you can set up to 4 zones – maybe soon there will be models with even more zones.
Then you press the button “Define zones”. The mowing robot now simply drives along the outside of the boundary wire and you follow it. Whenever you want to set a remote start point, you press a button in the app. The mowing robot remembers this point by remembering the number of meters it has travelled from the charging station.
For each zone you can define a remote start point. At the end you can then use the slider in the app to determine the percentage of mowing on each area. For example, if you have two areas and set the value for the first area to 80% and the second to 20%, the mower will spend only 20% of its time on the second area and the rest on the first area during the week.
In this video you can also see again what the whole adjustment process looks like:
Other manufacturers use different terms, but basically mean the same or something similar. Related terms are: secondary zones, secondary areas, additional zones, number of mowing units.
This is a selection of some robotic mowers that can mow at least one adjoining area in addition to the main area and have an extra function for this that is similar to the multi-zone function or remote start points.
| Model | Number of extra zonesse |
|---|---|
| AMBROGIO L200 Carbon Blackline | 2 |
| AMBROGIO L250i Elite GPS | 8 |
| AMBROGIO L350i Elite GPS | 8 |
| AMBROGIO L400 | 8 |
| AMBROGIO L60 Deluxe | 1 |
| AMBROGIO L60 Elite | 1 |
| AMBROGIO L85 Elite | 3 |
| HONDA Miimo HRM310 | 3 |
| HONDA Miimo HRM520 | 5 |
| HUSQVARNA Automower 115H | 3 |
| HUSQVARNA Automower 305 | 3 |
| HUSQVARNA Automower 310 | 3 |
| HUSQVARNA Automower 315 | 3 |
| HUSQVARNA Automower 315X | 3 |
| HUSQVARNA Automower 430X | 5 |
| HUSQVARNA Automower 430XH | 5 |
| HUSQVARNA Automower 450X | 5 |
| HUSQVARNA Automower 450XH | 5 |
| ROBOMOW RC306 | 3 |
| ROBOMOW RS612 | 4 |
| ROBOMOW RS622 | 4 |
| ROBOMOW RS630 | 4 |
| ROBOMOW RX20 | 2 |
| WORX Landroid L 20V WR150 | 4 |
| WORX Landroid L 20V WR153 | 4 |
| WORX Landroid M 20V WR140 | 4 |
| WORX Landroid M 20V WR143 | 4 |
Lawn coverage for Automowers (Manual)
The manufacturer Husqvarna produces a model of robotic mower called Automower. These models have a function called “lawn coverage.” In this section I will discuss the manual version of this function. Some Automowers are equipped with GPS, which makes the lawn coverage function run automatically.
With the manual lawn coverage function, you can define up to 5 remote areas that the mowing robot should approach. In addition to the boundary wire, Automower has one or more guide wires that start at the charging station, run through the middle of the lawn and end at the boundary wire.
The cables are laid so that all areas of the lawn are traversed by a guide wire. So if you have several adjoining areas, you must run the cable from your charging station through your main area, then centrally through the connection to the adjoining area and finally across the adjoining area itself.
The following graphic shows you an example of a complex yard with several adjoining areas and 2 guide wires.
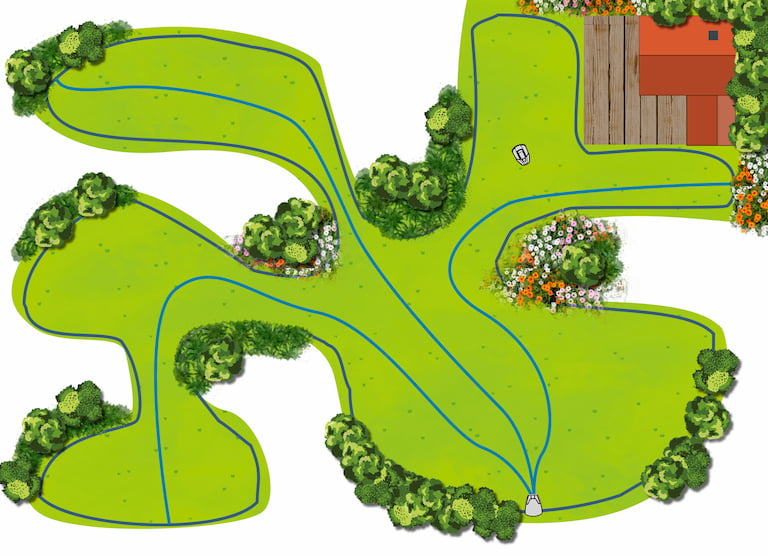
On all robotic mowers that have a guide wire, the guide wire is used to show the mower the way back to the charging station. This is particularly important in complex yards where it is impossible for the robotic mower to find its way back to the charging station by chance, especially if it is located in an adjoining area.
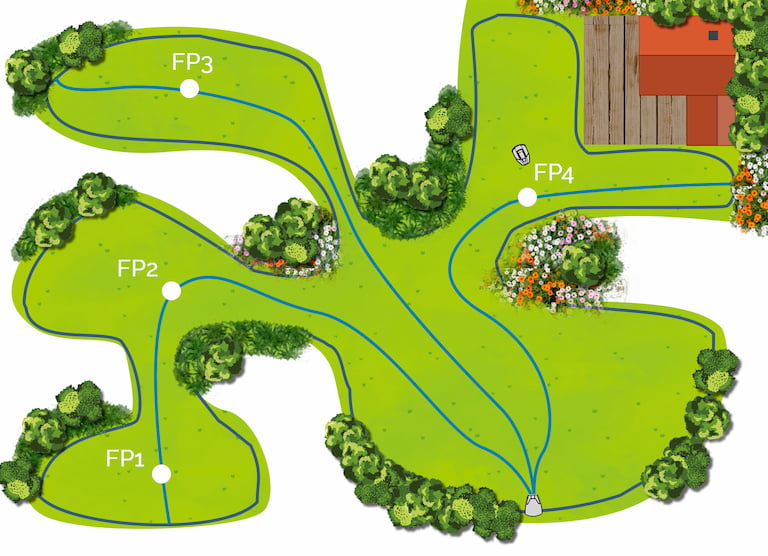
But the guide wires also have another purpose when it comes to the Automower models. As part of the lawn coverage function, you can set remote start points on the guide wires, similar to the multi-zone function. They just don’t call themselves that with the Automowers. In the menu they are usually found under Installation -> Lawn coverage -> Area (1-5). There you will find the items How?, How far?, and How often?
Under How? you can determine how the robotic mower should reach the area X. You can choose which guide wire you will be setting the remote start point on.
In the section How far? you set how far the mowing robot must travel over the guide wire to reach the remote start point. In a special test mode you can also let the Automower drive over the guide wire and press STOP to measure the distance. This distance is then immediately used for the remote start point.
The section How many times? allows you to specify how often the mower should approach this point. This is also very similar to the multi-zone function. Here, for example, it makes sense if you select the percentage value so that it corresponds approximately to the area of the adjoining area as a proportion of the total lawn area.
An example: You have set up a remote start point on 3 side plots. Two of them are on the first guide wire and one on the second.
- Which cable: You can set which guide wire the remote start points are located on under How?
- Distance: Point 1 is 50 yards from the charging station, point 2 is 80 yards, and point 3 also 50 yards (How far? ).
- Frequency: With How often? you have set 30 % for both of the adjoining areas 1 and 3 and 10 % for area 2, because this is particularly small and therefore requires less “mowing time”.
The mowing robot will now not always start mowing at the charging station during the course of the week. Instead, it will drive over the guide wire to area 1 and start mowing there in 30% of cases, to area 3 in 10% of cases and again to area 2 in 30% of cases.
Lawn coverage function for Automowers (with GPS)
Some Automowers have GPS-assisted navigation. This is used in tandem with the lawn coverage function. I have just explained to you how you can use the lawn coverage function to manually set points on the guide wires that are located in the adjoining areas you want to mow.
If the Automower is in “GPS Auto” mode, this is not necessary. After installation, the mowing robot will randomly drive around your lawn for a few days, as well as drive over the guide wires to reach different points. During this time, it is in search mode instead of mowing mode. In this search mode the mower is switched off.
During these first few days, it collects GPS data on your yard. After a few days it will have created a digital map of your lawn. On this map, it now remembers when it last visited each location.
The Automower can also use a special resistance sensor in the mower deck to detect how high the grass has grown and can thus calculate how fast the grass is currently growing in various places in the yard. It is therefore able to create a digital map that shows not only the dimensions of your lawn, but also the current average grass growth speed in each area.
This means that you do not need to give the robotic mower any remote start points, nor do you have to give it percentages of how often it should drive to each location. It does all this completely automatically.
Sounds like pretty advanced technology, right? It is! Automowers with GPS cost a good two or three times as much as a “normal” robotic mower, generally between $2,500 and $5,000. For this price, however, they can handle the most complex yard layouts.
Separate areas
The systems presented so far all serve the navigation of robotic mowers between connected surfaces. But what if you have areas in need of mowing that have absolutely no connection, and are separated by a wall or even a building?
In such cases, other solutions are needed, which I would like to discuss here now. Let me address one key thing before we dive into it: All these solutions require regular human intervention and do not work completely automatically, as the systems mentioned above do, which, as a fan of automation, I find to be a major drawback.
If there is no connection between two lawns, the mowing robot unfortunately cannot conjure itself from the main area to the separate area. It must be carried to the separate area in any case.
Separate area with common boundary wire
Having two separate areas does not necessarily mean that you cannot use the same boundary wire to connect them, even if, say, your house is in between. For example, if you want to connect the main area in your backyard to a separate area in your front yard, you can run the cable through the basement or through the gutter.
The boundary wire that runs around your main area is interrupted at one point because it branches off here to reach your separate area. When it arrives at the separate area, the cable runs completely around the separate area and is then led back to the main area to complete the perimeter of the main area. The following graphic shows what the whole thing can look like.
The nice thing about this is that, for once, you don’t have to make sure that the back and forth boundary wire between the main area and the separate area is far enough apart. This way you can lead it back over exactly the same distance as you led it there. If you use empty conduits for this, you can run both cables through the same conduit.
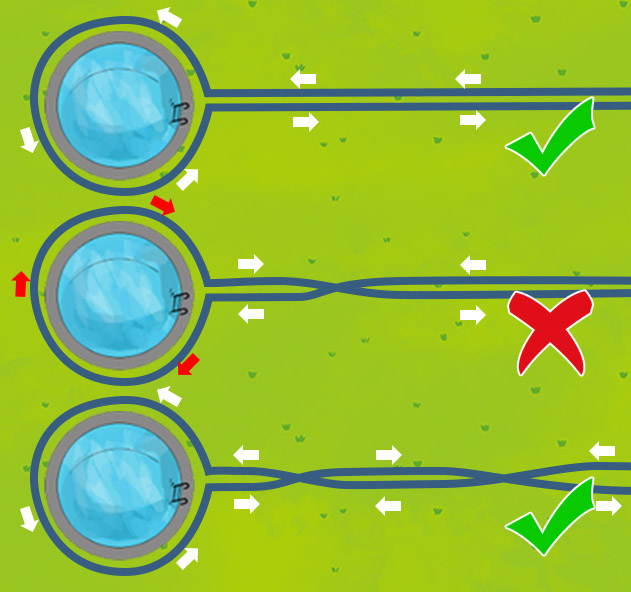
IMPORTANT: There is one thing you have to pay attention to. The cable that runs out of the main area towards the separate area on the left must also come out on the left side of the separate area. If the direction of circulation around the separate surface is reversed, the boundary wire will create an inverted magnetic field.
This causes the robotic mower to think it is no longer in the mowing area at all, when it is actually in the separate area. Contrary to the instructions, the boundary wire may cross itself, but it must then cross again to create an even number of crossings so that each wire comes out on the same side again and the current circulates the separate area in the same direction as it does in the main area.
One option to get the boundary wire to the separate area is to run the cable through the basement like I mentioned earlier. You can even use cable coverings to run the cable along the ceiling, in which case it won’t be as noticeable.
Another possibility is to take it over the house by threading it along your gutter’s downspout. For this you can also use an empty conduit which has a similar color as the downpipe. Or you can use a cable with a similar color, for example brown.
At the top you can continue it under the eaves and lead it down again on the other side.
Newer buildings may also have special cable ducts, which you can also use to guide the cable over the house.
When the construction is finished, you now have to carry your mowing robot to the other side at regular intervals and let it continue mowing there. It will not even notice that it is in another area and will continue mowing as normal. After a while, you can carry it back over to the main area where you can either leave it on the lawn or, if the battery is empty, place it in the charging station.
Separate area with separate boundary wire
There are also situations where there is absolutely no way to take the boundary wire from the main area to the separate area and back again. For example, the separate area could be on a different plot that is not connected to the plot on which the main area is located. Maybe there are other plots in between or the other area is located somewhere else. But there are solutions for this as well.
Somehow the separate area must be surrounded by a boundary wire, or the robotic mower will not start mowing. Only if it can register the signal of the boundary wire with its sensors, it knows that it is safe to mow, and drives off. Exceptions are cheaper noname models or mowing robots without boundary wire. I will come back to the latter later.
So what can you do so that the separate area also has a boundary wire? Well, there are actually only two solutions. The first is to buy a second charging station, and the second, a so-called perimeter switch, which is not available for all models of robotic mower.
Possibilities for generating a loop signal in a separate boundary wire:
- Second charging station
- Signal transmitter/perimeter switch
For a second charging station, install the boundary wire as normal from the charging station. So it runs from the charging station, around the entire separate area and back to the charging station. With some models you may have to teach a new loop signal to the other charging station every time you move the mowing robot.
A signal transmitter or perimeter switch saves you the purchase of another charging station and the need to train the loop signal again. It replaces the charging station in your separate area and supplies power to the boundary wire there or generates the signal in the boundary wire. If you have the possibility to buy such a signal generator/perimeter switch instead of a charging station, I would definitely recommend it!
However, if you want to save yourself the hassle of carrying the mower back and forth, you should perhaps simply buy a second mowing robot if the size of the separate area justifies this investment. After all, it is your precious time that you have to invest here regularly, even daily.
Robotic mower without boundary wire
Perhaps a robotic mower without a boundary wire is just the right thing for you. If you don’t mind transporting the mowing robot regularly between the different areas, this is definitely an option you should consider.
Mowing robots without a boundary wire work, as the name suggests, without a boundary wire. They orient themselves completely with sensors that they have on board. There is also no charging station where they can dock. You must always charge them manually with a charging cable.
In addition to the shock sensors, which the mowing robots with boundary wire also have, mowing robots without boundary wire also have a so-called grass sensor. This is able to detect whether the mowing robot is currently still on the lawn or not.
However, this sensor is not nearly as reliable as a boundary wire. If you want to operate such a model, the best thing to do is to make sure that the mower is prevented from leaving your lawn by a barrier, e.g. a fence.
In addition, the grass sensor cannot distinguish between your lawn and your neighbour’s lawn. If your lawn does not have a clear boundary separating it from your neighbour’s lawn, a robotic mower without a boundary wire will simply drive over to your neighbour’s lawn to mow it.
But there is the huge advantage of having the flexibility to use your robotic mower on any lawn, because there is no need to install a cable or a charging station.
Connecting surfaces by tunnel circuit
There are some areas that may technically be considered separate surfaces, but ultimately can be connected to the main surface. In these cases, the long distance or detour that the mowing robot would have to travel may make a connection seem impossible at first.
Perhaps you have a bigger yard than most, and it is separated by your house, but connected by a paved path that runs around the outside of the building.
These areas can be connected so that your robotic mower can move from one area to the other without you having to carry it over.
The two surfaces can be connected by a passage that is bordered on the left and right by the boundary wire. In the middle of the passage there is a guide wire that connects the charging station and the main area to the adjoining area, so that the robotic mower can find its way through the passage to the adjoining area in search mode.
But there is a problem: What prevents the mowing robot from driving into the passage in mowing mode and mowing there even though there is no lawn? It would spend hours there mowing and possibly not even find its way out if the passage is very narrow.
There are two tricks for that:
A: The loop trick
At the entrance to the passage, you can make a small loop on the left and right, which narrows the entrance to the passage considerably. Through such a loop the mowing robot can only enter the passage if it is heading straight towards it. If it arrives at an angle, it is not possible for it to drive into the passage.
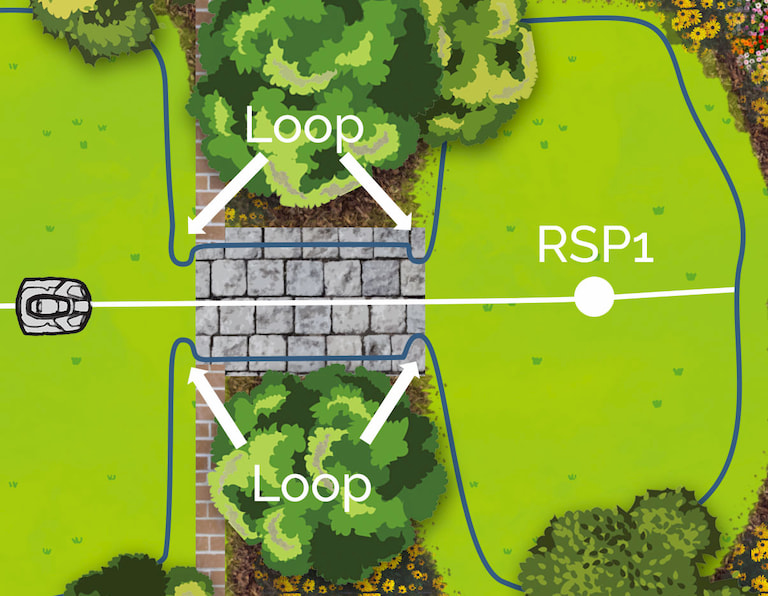
If it is well done, the mowing robot then really does hardly ever drive into the passage. Only in search mode, when it wants to drive over the guide wire to the distant adjoining area, does it fit perfectly through the two loops, because it will be driving straight directly through the passage.
B: The passage circuit
However, if the loop trick does not seem safe enough for you and you are afraid that your mower will get caught in the passage, e.g. if you are on vacation for a longer period of time, there is also the possibility of installing a so-called passage circuit (also called a tunnel circuit).
An additional cable is installed to enclose the entire passage. This cable is connected to the boundary wire via a switch and is supplied with power. This prevents the mowing robot from driving through the passage when the switch is switched on.
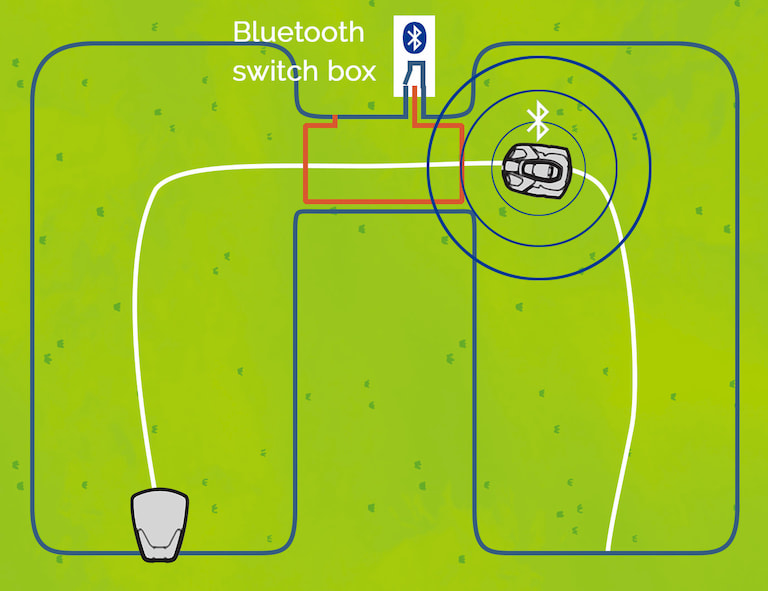
The switch can either be connected to a timer or you can equip your robotic mower with a Bluetooth receiver. Then, depending on which one you chose, you can either set times when the passage is open, or your robot will connect via Bluetooth to a passage circuit and, in search mode, give the OFF command to the passage’s Bluetooth switch so that it can drive through the passage.
You can read more about this in this article in the section on passage switching.
This video explains the problem once again:
Overcoming height differences between separate areas
Sometimes two different surfaces cannot be driven over by the same robotic mower because there is too great a difference in height between them. Here you can consider installing a special ramp for the mowing robot, depending on the situation and the nature of the yard. However, such ramps usually only work with a proper passage circuit, as I explained in the previous section.
Now, if you don’t have a clear picture of what the whole thing could look like, here is a website of a German company that builds ramps specifically for robotic lawn mowers. They only operate in Germany though. I still have to find a company in the US that does something like this. Feel free to contact me, if you know one.
The right area output of the mowing robot
Different models of robotic mower have different maximum area outputs. The maximum area a specific robotic mower can mow is advertised on every robotic mower. However, this specification is only valid under ideal conditions, which are almost never achieved in reality.
The information is therefore somewhat misleading to a regular person at the beginning, as you usually have to add on some area output to make sure that the mowing robot can also manage your area. Here you can read up on how to interpret the acre specification exactly.
Especially if your robotic mower mows in two or more individual areas, whether they are connected or not, you should plan for a lot more area output. If you would like to learn more about how to find the right area output for your lawn, this article should be very helpful for you.
By the way, here you can find my recommended mowing robots for different area sizes:
- Recommended Robotic Lawn Mowers for Small Yards 2021
- Recommended Robotic Lawn Mowers for Medium Yards 2021
- Recommended Robotic Lawn Mowers for Large Yards 2021
Related questions
Can the perimeter wire be run underneath paving stones? The perimeter wire of the robotic mower can also be guided under paving stones. The cable can be laid up to a depth of 4 inches. On some models the cable can even be laid to a depth of 8 inches.
Also interesting: Robotic mower laying boundary cables under paving stones
Can the robotic mower drive over gravel paths? You should avoid driving over gravel paths in your yard with a mowing robot. The blades and the mowing unit of the robot can be damaged by the gravel. The mower can also get stuck in the gravel, especially if it is a three-wheeled model.
Also interesting: Lawn with gravel paths: Safe crossing with the robotic mower


Hi, thanks for the article, very informative in supporting my own conclusions from my research. My question is not quite the same issue but related … how would you set up a temporary restricted area on a lawn say to protect as area with spring bulbs such as daffodils? Do you know if anyone has a switching device that can redirect to flow through a structured perimeter wire layout so areas can be restricted or opened up on demand. I cannot see that ‘zoning’ or ‘area sectioning’ of lawns cannot do this.
Add an additional wire loop around the area of daffodils and add a switch, so you can temporarily route signal through the loop. Later, you can switch the signal back.
If an auto mower is sent to an adjoining zone some distance away from the charging station over a guide wire, and it starts mowing there, what stops it from also mowing the main area?
Hi
In your graphic on wiring the separate areas I don’t see where the boundaries wires join, it is shown as two separate loops. Is this correct?